|
|
Current Issue
Break Dance
Shane Van Boening is generally considered to have one of the best break shots in pool. How does he do it?
By Dr. Dave Alciatore
Not only is the break shot big and powerful and sexy (remember the opening scene in "The Color of Money"?), it is arguably the most important shot in pool. Whether you are playing 8-ball, 9-ball or 10-ball, consistently pocketing a ball and controlling the cue ball after the break makes you a heavy favorite to win the game.
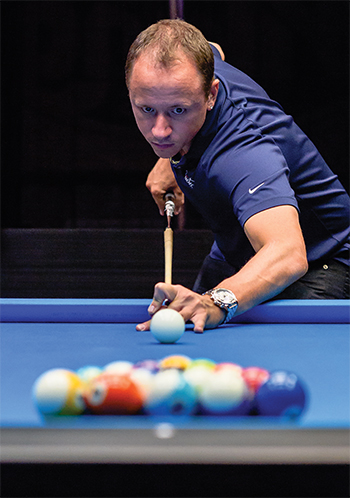
Shane Van Boening
The break is one of American star Shane Van Boening's most potent weapons. Arguably the best pool player in the world, Van Boening has been known to work on his break for hours at a time. Some time back, Van Boening committed to never again losing a tournament due to inconsistent breaking and spent four to six hours a day for more than two weeks working solely on his break. Van Boening realized the importance of the break. Clearly, his hard work has paid off.
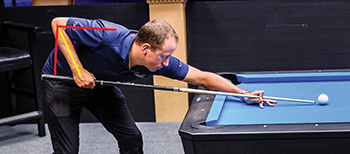
Photo A
I had a chance to videotape and analyze Shane's break earlier this year. There are several distinctive and important elements of his technique.
Shane does several things to help create controlled power. First, he aims the break shot as carefully as any other important shot. Few players focus on precision on the break shot, but the most important attribute of a good break is getting a square hit on the lead ball. Shane also chokes up on the grip. Generally, the forearm should be perpendicular to the cue at tip contact (red line), but in this case, moving the grip forward (yellow line) can help put the shoulder and elbow into stronger positions during the stroke into the ball. Notice Shane's tip position when he addresses the cue ball (Photo A). The tip is well below center, which might make you think he will impart draw to the cue ball. However, during his stoke, he drops his elbow to add power. As a result, he actually strikes the cue ball slightly above center (Photo B).
The above-center hit creates slight topspin, which helps the cue ball slow after bouncing back from the collective weight of the racked balls.
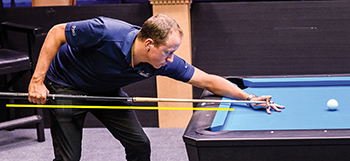
Photo B
Shane also lifts his body prior to the final forward stroke (Photo C). The elevated body position, in combination with the choked up grip, allows him to create more leverage with more distance from the shoulder to the grip. This allows him to generate more power with less effort. With less effort required, Shane doesn't sacrifice control and consistency. Shane actually lifts his body and drops his cue during the backstroke and during the initial part of the forward stroke into the cue ball. This can also be done before the stroke, with the cue already in a near-level position. Most players will have better accuracy and consistency if they raise their body and lower the cue before the final stroke.
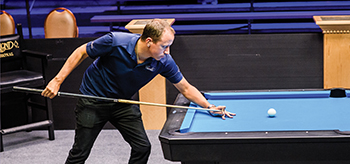
Photo C
Notice in Photo C how relaxed Shane's grip and wrist are as he begins to accelerate forward. It is as if his arm is doing all the work, and the grip and wrist are just along for the ride. Also, notice how he has the cue as level as possible during the forward stroke into and through the cue ball. This limits the amount of air time the cue ball has on its way to the rack. Shane moves his entire arm, flexing and dropping his elbow together to generate more power while keeping the cue on a level plane. On most pool shots, it is best to keep the elbow relatively still during the stroke into the cue ball. With the break shot, however, dropping the elbow can be very helpful.
Shane has excellent acceleration into the cue ball with a complete and straight follow-through. He keeps his head and body very still during the final stroke into the cue ball. As you can see in Photo D, his head and upper body are in perfect focus, while the moving arm is not.
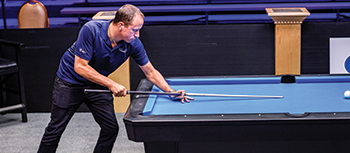
Photo D
To view video analysis of Shane's break, go to https://youtu.be/WAEnKCL3stU
Diagram One
9-Ball Break
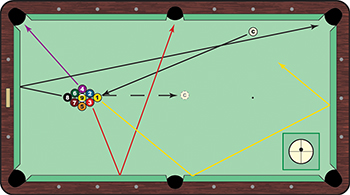
Ball Direction Tendencies
Depending on which game you play, strategy varies for where to place the cue ball and how you hit the break to get the best chance of pocketing a ball. Obviously, if you don't pocket a ball on the break, your break shot is not successful. The player shooting after the break will often be a heavy favorite to win the game, and you don't want that player to be your opponent.
The diagram illustrates a standard 9-ball break shot from the side rail. The ball easiest to pocket is the near "wing ball" (the 4). The opposite second row ball (the 3) also has a good chance to bank cross side. And the back ball (the 8) often heads off the end rail to the corner up table. With appropriate speed and cue ball angle, the 1 ball can be pocketed in the opposite side pocket. The diagram shows a better strategy, where the 1 heads up table for a shot in the bottom-left corner if you squat the cue ball in the center of the table after the break.
Because it is so easy to pocket one or more balls with the break shown in this diagram, tournaments sometimes place added restrictions on the cue ball position and/or rack to make the game more challenging and more interesting for viewers to watch. One common rule change is to require breaking from the "box," with the cue ball within a diamond left or right of the head spot. Another common rule change is to require the 9-ball (instead of the 1 ball) to be placed on the foot spot. This shifts the rack up table just enough to make it more difficult to pocket a wing ball reliably. Both of these changes can make it more difficult to pocket the wing ball or the 1 ball. But regardless of what a tournament director might attempt, the good breakers still always seem to find ways to pocket a ball. A common approach is to use a softer "cut break" where the 1 ball is hit slightly off center to help pocket the 1 in the side or a wing ball in the corner.
Diagram Two
10-Ball Break
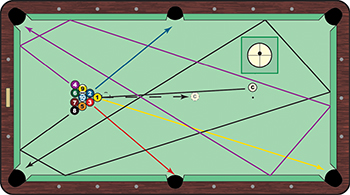
Ball Direction Tendencies
The diagram shows a standard 10-ball break. With a square hit, the front ball generally heads up table, sometimes toward the corner pocket. The second row balls usually head toward the side pockets. One reason to position the cue ball slightly off center is to create slightly different angles to the side pockets, giving the best chance for at least one of the second row balls to go. Also, the corner balls tend to go four rails around the table toward the corner pockets. With a good rack and a good hit, if nothing else gets in the way, these balls often have a chance to go. If you want to see an awesome example of an effective 10-ball break, see the video on the "break technique" resource page in the FAQ section at billiards.colostate.edu. The video shows Van Boening pocketing five balls, including four of the balls shown in the diagram above.
Diagram Three
8-Ball Break (Second ball)
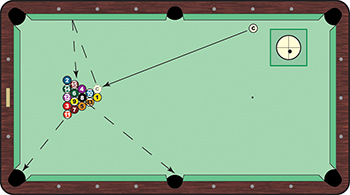
Ball Direction Tendencies
A common 8-ball power break is very much like the 10-ball break shown in the previous diagram. With a good rack and a good hit, the lead ball, second row balls and corner balls head to the same pockets as with the 10-ball break. This diagram shows another common 8-ball break, where you break from the side rail and target the ball in the second row, instead of the 1 ball. With this break, softer speed can be used, resulting in good control. If you hit the second ball as squarely as possible, the rack usually spreads well. Also, the 8 ball will generally move out of the rack area. If playing under rules where pocketing the 8 on the break counts as a win, the second ball break is a good option, since the 8 ball motion gives you the best chance to pocket the 8 on the break. For more information and advice concerning the second ball 8-ball break, see my June 2016 BD article and online video NV G.9, which demonstrates all of the pros and cons with numerous examples.
It is important to point out that even with a consistent and accurate break shot, the balls won't always head in the directions indicated by the diagrams shown here. A racking template can help a great deal in reducing some of the variability from one break to the next, but they aren't always allowed. Ball directions and motion are also affected by the condition of the balls, cloth, and cushions.
10 Tips to a Great break
Use Only as Much Power as You Can Control
An accurate (square) hit on the lead ball is the most important factor for a good break. Therefore, only use as much power as you can control. If you deliver more speed to the cue ball, but the cue ball hits the lead ball at an angle, not only do you risk jumping the cue ball off the table, the cue
ball will not deliver its full energy to the rack of balls.
Don't Use Sidespin
Adding sidespin, intentionally or not, is a bad thing on a power break shot. With sidespin comes squirt (cue ball deflection), making it much more difficult to be accurate and consistent with your aim. Also, any energy put into spinning the cue ball takes away from energy associated with the cue ball moving forward; so sidespin will reduce the energy going into the rack of balls. Sidespin can also make the cue ball fly around the table more if your hit isn't square, and this can increase the risk of scratching.
Relax
Break technique is more about finesse and timing rather than brute force. An important element of this is keeping the grip and wrist as relaxed as possible. A "death grip" will not add any power to the break. In fact, it will do just the opposite by constraining and limiting full and smooth acceleration. It is okay to tighten the grip as you approach the ball — this can help some people create a little more power — but make sure the grip is relaxed to begin with.
Use a Longer Bridge Length
One easy thing you can do to add more power is to lengthen your bridge. A longer bridge provides more distance to smoothly accelerate the cue to create more cue speed. Regardless of bridge length, make sure your bridge hand is planted firmly before and during the stroke into the ball to maintain accuracy and consistency.
Keep the Cue as Level as Possible at Impact
If you strike the cue ball with the cue elevated more than necessary to clear the rail, it will hop higher on the way to the rack, increasing the chances for the cue ball to hit the lead ball while airborne. This isn't much of a problem with a perfectly square hit, where the cue ball will simply hop straight up in the air; but with a hit slightly off center, the cue ball can easier jump off the table.
Accelerate Through the Ball
Be sure to accelerate smoothly and completely into the cue ball and into the follow through. This helps create more cue speed and breaking power.
Follow Through Completely and Straight
Make sure your follow through is straight and complete. This helps ensure tip contact-point accuracy and fosters complete acceleration into the ball in an unconstrained way.
Squat the Rock
Control the cue ball and park it in the center of the table. To do this, the cue ball must have slight topspin when it reaches the head ball. The weight of the rack of balls makes the cue ball bounce back naturally, and slight topspin is necessary to slow the cue ball to a stop close to the center of the table.
Choose a Break Cue Wisely
A hard tip creates more cue ball speed for a given stroke effort. If a phenolic tip is allowed in the rules under which you play, use that — it results in the best hit efficiency. If not, use the hardest tip allowed. Also, choose a break cue with a natural pivot length well matched to your preferred break bridge length. (For more information, see the "natural pivot length" resource page in the "cue" FAQ section at billiards.colostate.edu).
Diagnose and Adjust
Be observant of how the balls react when you break so you can make adjustments if balls are not falling. Fiddle with cue ball position and speed to see what works best on a given table. Also pay attention to what your opponent is doing, particularly if they are more successful. There's nothing wrong with copying something that works.
Top |
|

