Practice your 8-ball and 9-ball patterns in one great drill.
As you probably know by now, if you really want to improve your game you must practice with purpose. Yes, practice can be really boring. And, yes, it is difficult to maintain focus when you are practicing by yourself. Thatís why I create challenging drills for myself and only practice for a few hours at a time.
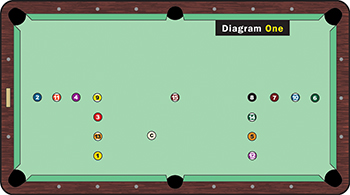
I have also adapted some of my drills to different games, and I use the drill shown in Diagram One to practice both 8-ball and 9-ball. I originally developed this drill to practice 15-ball rotation. But with the World Pool Series, I wanted to adapt it to 8-ball. The only problem is, I hate practicing 8-ball and leaving all the remaining balls on the table after running out my colors. What I do in this drill is run the 1 through 8 for 8-ball, the finish the 9 through 15 in rotation. Doing it this way keeps me focused because itís like two drills in one.
This is a great drill for patterns and for staying on the right side of the ball. These are shots that come up all the time in games. A lot of the drills I put together are built to help you practice cue ball control, speed control and staying on the right side of the ball. You should try to complete this drill without touching another ball because, in 8-ball, you really want to avoid bumping into balls. Trying to avoid other balls will really force you to learn how to stay on the right side of the next object ball.
The 1 through 8 may appear to be just another rotation practice, but I place them in rotation order just to show you what the proper pattern should be. In 8-ball, you want to break the table down into sections and play one section at a time. You donít want to be going from one end of the table to the other on every shot. The key in 8-ball is to look first for your key ball ó the ball that gets you to the 8 ball. In this case, it is the 7 ball. The stripes are on the table to add congestion, and I put the 15 in the middle of the table because it forces you to be precise with the cue ball. If the middle of the table was wide open, it would allow too much room for error. This way is more challenging.
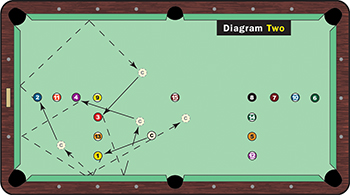
The first shot (Diagram Two) is very easy. You just roll the 1 in and make sure you land high on the 2 ball. After the 2 ball, a lot of people would probably play for the 4, but thatís the wrong shot. You could get trapped trying to get shape on the 3. If you get straight in on the 4, or get on the wrong side of it, it becomes very hard to get shape on the 3 in a manner that would allow you to get back up table for the 5. Itís important to play the shot high from the 2, going off the bottom rail and side rail to get into the center of the table for the 3. Even if you donít come up perfect on the 3, you can come across for the 4 or play the 4 in the same pocket as the 3. Either way, playing the 4 gives you the best angle to get shape on the 5, which is the key shot in this rack. If you donít get good shape on the 5, itís going to be tough to finish the run-out.
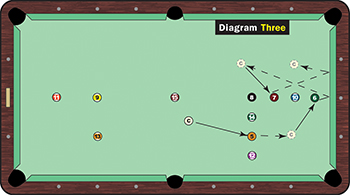
The two key shots are from the 2 to the 3, and from the 4 to the 5. Once you get on the 5 (Diagram Three), the rest is easy. Then I make sure I leave a nice angle on the 8 ball so that I can play the 9 through 15 in rotation. Again, itís a matter of staying on the right side of the ball, because that 15 ball being in the middle of the table makes it a little tricky if you donít.
This is a great drill for any level player. Amateurs will improve their pattern play with this drill. Too many amateurs play one or two balls at a time, and this will help them get in tune to spotting the proper patterns. It will also get them to learn to play in sections, which is important. Itís good to start up table and work down table. You could even do this backwards, starting with the 5 through 7 and then work back to the 1 through 4 because the 8 goes into either corner pocket.


