Learn the quickest and easiest way to figure out kicking angles.
For years, the diamond system has been studied and practiced as a way to determine angles for kicking and to learn how the rails are playing. And while the diamond system may be the most accurate system out there, it really isn’t practical in tournament play for several reasons. For starters, because the diamond system is based on mathematical formulas, it takes time to make the proper calculations. Many tournaments, particularly the biggest international and televised tournaments, use a shot clock. You can scramble your brain and run out of time trying to figure out the proper angles with a clock ticking away. Also, the longer a match goes and the more fatigued you get, your concentration and focus are really taxed. Adding mathematical calculations to the mix can take its toll. The pressure of a match can also make calculations tough to handle.
These days, many of the top players are using the mirror image and using it to good effect. It is an easy system to learn at any level, and, for me, it is the quickest and easiest to work out when you are under the gun pressure wise and/or time wise.
Here are a few examples and a few drills to help you better understand mirror imaging.
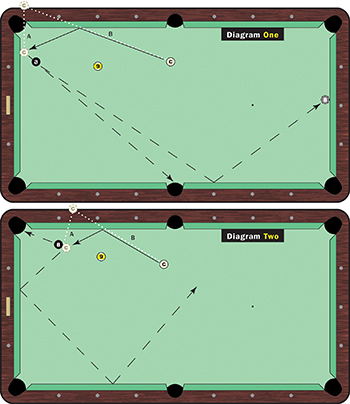
Diagram One shows a simple two-rail kick. Most players, regardless of skill level, can hit the 8 ball. But to guarantee best results, you need to hit the shot perfectly and with perfect speed.
The 8 ball is a ball and a half from the short rail. If the 8 was closer to the rail — frozen or an inch or two from the rail — I would come across the table, long rail to short rail, and make it in the bottom right corner. But as you can see, there is too much distance between the 8 and the rail, so you risk missing the ball completely. This shot would require a perfect two-rail hit on the 8, and if you don’t make the ball, your chances of getting safe are pretty slim.
In this case, your percentages are dramatically increased coming short side. (This would be true for any ball that is between one and three ball’s distance from the rail.)
Measure the center of the cue ball at its desired contact point on the short rail to the edge of the corner pocket. Using your eyes or cue, double that distance (white dotted line A). In this case, you can see that I’m a good diamond out from the rail. Follow that spot back to the cue ball, and the point at which it crosses the long rail is the point of contact for your shot (white dotted line B).
I play shots like this high on the cue ball, say 11 o’clock, and at a speed that gives me the best chance to be safe. If I make the 8 in the side, fine. My main object is to have the 8 come off the long rail and drift up to the top rail. Perfect speed is crucial when using a kick shot to play safe. If you hit the shot too hard or too soft, you will probably leave your opponent a shot.
Of course, this takes some practice, and you should try different spots on the table. But don’t worry. The results will come quickly with less time spent analyzing.
Diagram Two offers a one-rail kick, but you use the same principle. Since the intended contact point off the rail is the 8 ball and not a second rail, double the distance from the contact point on the 8 to the long rail (white dotted line A). Again, follow that mirror point back to the cue ball to determine your contact point on the long rail (white dotted line B). I would use high cue ball on this as well. Speed, of course, is critical. And on this shot, you must hit it with confidence. Commit to making the 8 because your chances of getting safe on this particular shot are pretty slim. Your only chance of getting safe would be overcutting the 8.
Be aware of tendencies. If you keep hitting this shot fat, it may be because the cloth is new and you need to allow for the slide that sometimes comes with new cloth and/or dry conditions.
Practice and experimentation are the best way forward with this system. It is an easy thing to practice and you will master this in no time. For certain, your safety play will improve dramatically and immediately. Kicking safe is an art in pool, and it is something I love to play and watch. There is nothing more satisfying than outsmarting your opponent and beating them with safety and kicking skills. Your ability to escape tough situations is a psychological back-breaker for your opponent.