Here is a drill that will test your cue ball control.
Since cue ball speed and pinpoint position are so critical in rotation games, I’ve been working on this drill for the last couple of weeks in preparation for upcoming events. To me, it is the ultimate 14-ball rotation drill.
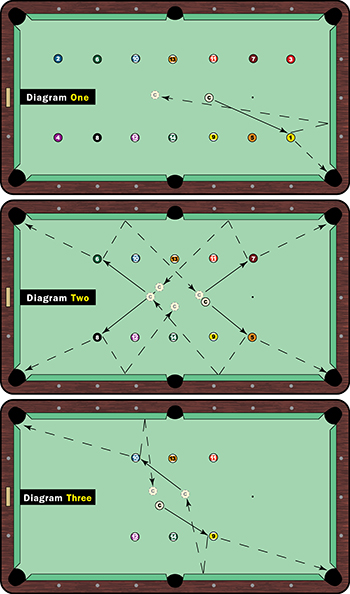
The layout for this drill is shown in Diagram One. The 14 balls are positioned in rows one diamond off each side rail and a diamond’s width apart. You start with cue ball in hand from somewhere inside the two rows of balls.
There are several ways to practice this drill. Unless you are at the pro level, I would recommend making 1-14 any way possible. The caveat is that the cue ball must not touch another object ball. Once you’ve completed the drill, you are ready to move to the pro version.
In the pro version of the drill, the player’s cue ball must strike at least one rail after contact with the object ball (again, not touching any other object ball remaining on the table) and all balls must be pocketed in corner pockets only.
The drill starts off relatively easy, with simple one-rail shots using follow on the 1, 2, 3 and 4 ball (Diagram Two).
The key to continuing is to make sure you are on the correct side of the 5 ball. So, from the 4 ball I will play the 5, come off the side rail and go between the 9 and the 14. I will play the 6, 7 and 8 balls the same way.
It gets trickiest with the final balls because the side pockets are not an option (Diagram Three). The 9 ball is a simple one-rail shot, as are the 10 and 11 balls. Again, make sure you leave an angle on the 13 to come across for the 14.

This is a great drill because it forces you to use all shots — follow, one-rail into perfect spots, punch shots with a touch of outside English. You also have to be able to move the cue ball between object balls. And leaving yourself on the right side of the next ball is critical.
These shots come up in nearly every rack of 9-ball, and all rotation games emphasize the use of various shots (follow, spin, punch) and pattern play.


