Pattern play up and down the table is a rotation games must.
Good pattern drills are ones in which you have two or three options on each shot. You can choose based on personal preference, but the principle never changes: You have to play the patterns that make the drill as easy as possible for you.
The shots in this 10-ball pattern drill come up all the time in rotation games. The drill is easy to set up and there is a lot of space to move the cue ball around. What I like about this drill is that you have to go up and down the table for each shot. That means good cue ball speed and use of the rails will be critical. You can also let out your stroke if needed.

The rules are simple: Start with ball in hand and pocket the balls in rotation without bumping another ball.
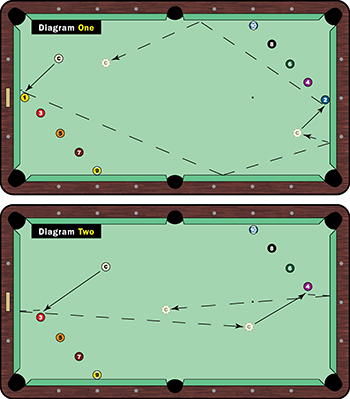
Think carefully on the first shot (Diagram One). Iíve seen players try to play this as a one rail shot. The problem with that is youíre shooting to a small area and a small angle by trying to go short rail to short rail. This option also brings the scratch into the corner into play.
The correct way to play this shot is to use two rails. You can control the cue ball and the speed easier, and it affords you a bigger angle area for position on the 2. I use just a tip of high left English and try to land the cue ball between the first diamond above the side pocket and the middle diamond. Itís a shot you need to practice to get the proper feel. Once you get this shot, it will come easy and your never scratch in the corner.
The 2 ball is similar, but donít get caught up thinking you should play it the same way, hitting the long rail above the side pocket. Why not? Because shape for the 3 ball is different than shape for the 2. You donít want to land straight in on the 3. You want to stay above it and leave a natural angle. Again, this is a rotation drill, so you should be thinking three shots ahead. I would load up on left English on this shot.
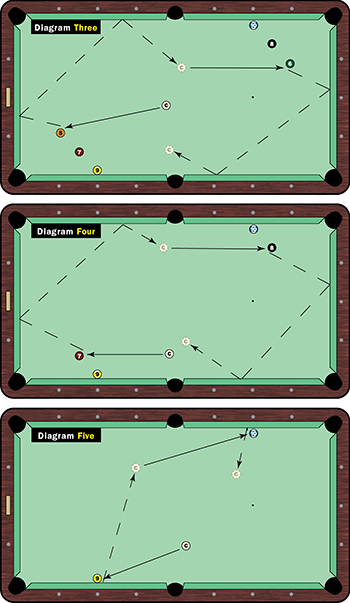
The 3 is a simple shape shot (Diagram Two), using high cue ball. Try to leave the cue ball above the 4. The shots on the 4 and 5 are also fairly simple (Diagram Three). Cue ball speed is important and stick to the natural lines. Try to leave the same shot for the 6 ball because going from the 6 to the 7 is the key shot.
Iíd prefer to land short and leave an angle from the 6 to the 7. If you come too far up table, youíll need to cut the 7 and just miss the 9. Thatís certainly possible but a little dangerous.
Ideally, youíd like to be on the left side of the table for the 7 (Diagram Four), but if you leave too much angle on the 7, youíll have to go two rails and come past the center of the table to cut the 8 ball to the right. Donít worry about the 10 ball. Itís not in the way unless you draw the cue ball into it.
Again, thinking three shots again, the diagram shows the perfect shape on the 8. High right cue ball will help avoid landing on the long rail for the 9. Also, you donít want to come too far up table and leave a thinner cut on the 9.

Decent position will leave you three options to go from the 9 to the 10 (Diagram Five). A soft punch shot just about center is the way itís shown in the diagram. If youíre more comfortable, you can play this with right follow using two or three rails, or you can let your stroke out and punch across table. Thatís my least favorite option because the scratch in the side is a danger.
Again, this is a really good drill with lots of options. It requires 100 percent focus. But if you can handle the right cue ball speed and proper amount of spin, it will reward you with a lot more confidence in your rotation game.


