This 15 ball drill will help with every part of your position game.
Here is a great drill for all levels that focuses on cue ball control, pattern play, playing in tight spaces, speed control and touch. There are four levels to this drill. Start where you feel comfortable and try to move up.
This is a great drill to keep your mind active and sharp. You can’t switch off for a second. You’ll have to understand the cue ball and keep tight control of it. Focus is critical.
Set up the table as show in Diagram One. All levels start with ball in hand, and you’re not allowed to bump balls. For Level 4, you’re allowed to use the rails and shoot the balls in any order. For Level 2, you’re not allowed to use the rails. Level 4 may use the rails, but the balls must be shot in rotation. And for Level 1, you may not use the rails and the balls must be shot in rotation.
The diagrams show my progression through the pro version, Level 1, but if you are starting at Level 4, I still suggest taking one of the outside balls first and keep the cue ball away from the rails. This will create more options for yourself. It’s also easier to control the cue ball.
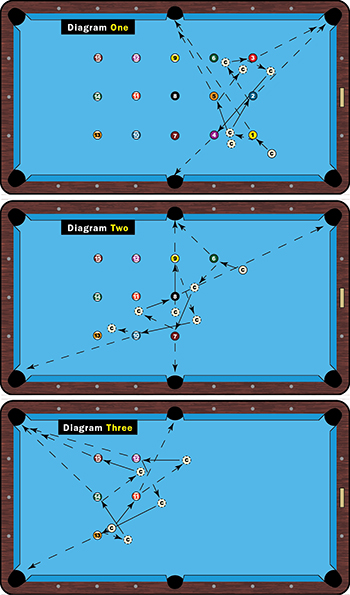
As you follow the shots through the diagrams, you can see how important it is to stay on the right side of the object balls (or straight, in some cases). Once you get to the 5 and 6, the side pockets will help make life much easier.
One of the tricky sections is the 7 and 8, so you want to be on the right side of the 6 ball. Stay as close as you can to the 7. Once you get to the 8 ball you’ll have a little more room to breath.
The key shot, to me, is the 9 ball. Especially at Level 1, where you can’t contact a rail, you don’t want to land short on the 10.
Make sure you get the right angle on the 11 to play shape for the 12 in the corner. This will give you room.
The final key shot is position on the 13 ball. At that point, you’re pretty much home free. A nice easy draw back for the 13 and punch draw for the 14. Slide over for the 15 and you’re home!