A great all-around drill for players of every skill level.
Here is an easy-to-set-up 9-ball drill that has different rules, allowing players of all levels to add it to their practice sessions.
The Corner-to-Corner drill is essential for all rotation games. It will improve your positional play and pattern play, forcing you to move the cue ball around the table. It will also improve your quarter-ball and half-ball cut shots.
The first thing you’ll realize is the importance of staying on the right side of the balls and how much easier it makes the game when you leave angles that send the cue ball to the next shot. Anytime the balls are wide open and nothing is tied up, you should be thinking three shots ahead.
Of course, sometimes you might get a little out of line. That’s not a bad thing in a practice drill. It forces you to use some creativity to get back in line.
I would start with the amateur level with this drill. Try it out and see how far you get. Don’t move on to the advanced level until you are completing the drill with some regularity. Once you are completing the advanced level, you can run racks playing in real time. You will be thinking like the pros do as they negotiate a rack, gaining a feel for the rails and speed and strokes.
As Diagram One shows, this drill is easy to set up, so if you fail it’s easy to get started again.
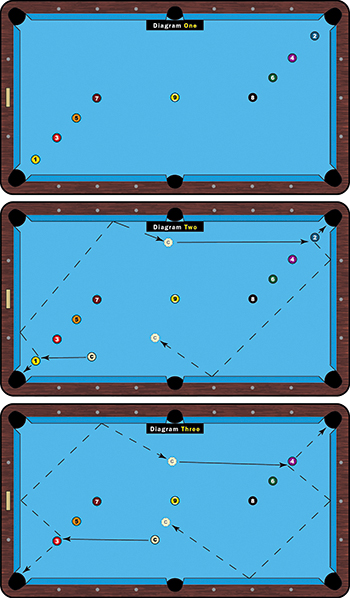
Beginner Level: Start with cue ball in hand. You can pocket the balls in any order, but the 9 ball must be the last ball pocketed. Bumping another ball is not allowed. Rail contact is not required moving from one shot to the next, and balls may be made in any pocket.
Amateur Level: Start with cue ball in hand. You must pocket the balls in rotation, 1-9. Bumping another ball is not allowed. Rail contact is not required moving from one shot to the next. Balls may be made in any pocket.
Advanced Level: Start with cue ball in hand. You must pocket the balls in rotation, 1-9. Bumping another ball is not allowed. Rail contact is not required moving from one shot to the next. Odd-numbered balls must go into the top left corner pocket, even-numbered balls must go into the bottom right pocket. The 9 may be pocketed into any corner pocket.
Here is how I would approach this drill:
First, keep note of the 9 ball. It is a big ball in this configuration, so always keep that in mind when devising your cue ball path. Start with the cue ball offering a nice angle on the 1 (Diagram Two), using high right English to go two rails. Try to leave the same angle on the 2 ball.
From the 2 to the 3, once again use a tip of high right.
I have always felt that it’s easier to judge speed on a two-rail shot than on a one-rail shot, so use high right English again, only a half-tip less right than on the first two shots to get from the 3 to the 4 ball (Diagram Three).
Again, high cue ball and a tip of right from the 4 to the 5. As you move through the drill, you’ll be getting a little closer to the 9 ball, so don’t leave too much angle on the 5.
As the shot is set in the diagram, I would either play high ball with no English off the 5 (Diagram Four) and try to get closer to the 6, or just a touch of right and leave myself a little longer shot on the 6. The 6 ball is the key shot in this drill, so don’t try to get too fancy.
From this position I would play the 6 with lots of outside spin and swing it two rails between the 8 ball and 9 ball. You could also use low right with more of a kill stroke and let the cue ball do all the work. If, on the other hand, you land a little closer and with less angle on the 6, you could play the shot with no English.
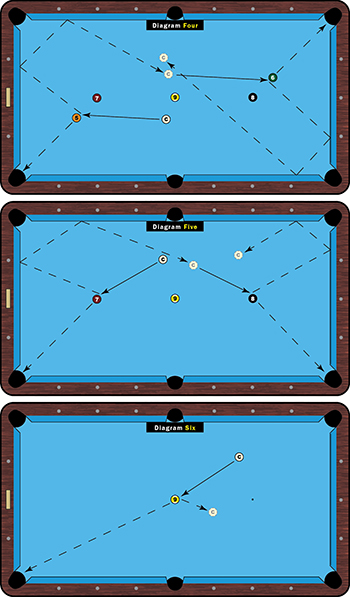
The shot on the 7 once again depends on the angle you’re faced with. As shown in Diagram Five, it’s either high ball with a half tip of right, using two rails, or a tip of left and playing one rail only. If you have less angle, try using high left and go two rails to the opposite side of the table. This is a personal preference decision. You have lots of options on the 7 ball because there are no other blocking balls.
Remember, in the advanced version of this drill, the balls prior to the 9 must go into their corresponding corner pockets, so play the 8 with a soft punch just above center cue ball and no English. You could always play for the 9 ball in the same pocket. Either way, commit to one pocket or the other before you shoot.
If you’ve made it safely to the 9, stay down and focus only on making the ball (Diagram Six).
Its ability to help you understand the cue ball and pattern play better makes this drill perfect for all levels.