Stay sharp during the summer with a few challenging drills.
Summer time is always a good time to tune up your game. For amateur players, league seasons have generally been completed. There are fewer tournaments during the summer as well. That should allow ample time for good solo practice sessions!
To that end, here are a couple of my favorite drills. I created these drills to help me work on my cue ball and speed control. As I always say, practice with purpose. These drills will really help you hone your game.
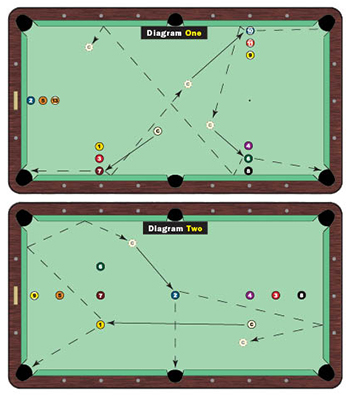
I call the first drill the “Dynamite Groupies Drill.” As you can see in Diagram One, there are four groups of three balls, three groups along the long rails and one group on the bottom rail. This is not a rotation drill, so the balls you set up and the order in which you set them up is irrelevant. The object is simply to pocket each ball, using at least one cushion to get to your next shot. The challenge, however, is in the rule that once you have pocketed a ball in one of the groups, you cannot return to that group until you’ve pocketed a ball from the other three groups.
Numerically, you can pocket the balls in whatever order you see fit. The general idea, when approaching balls in the groupings along the long rail, is to get a decent angle on each shot and bring the cue ball back to the middle of the table. That position offers you options on all three of those groups. You will have to plan ahead to get the proper angle on the balls in the group on the bottom rail.
The diagram shows the start to the drill. Since there is no predetermined sequence, your options will change depending on where your cue ball stops.It allows you a little wiggle room until there is only one ball left in each group. Then your position will need to be tighter. Once you’ve pocketed a ball from each of the four groups, you can select any of the groups to start your second round.
In Diagram One, I started with the 7 ball. I would recommend starting with the ball along the rail in one of the three groups along the long rail. With the resulting cue ball position, I determined that the 10 ball offered the best angle to get onto the third group of balls. Position on the third group is important for getting down to the group along the bottom rail. In this case, the 6 ball offered me the best angle to go two rails for position on that final grouping. Once you get to that final group along the bottom rail, select the shot that allows you to get the cue ball back to the middle of the table so that you can have multiple options for starting your second round.
This is a great drill because you are not committed to any sequence. You have to make decisions, and you have to be prepared to change your ball selection if your cue ball doesn’t get exactly where you originally intended. Also, you move the cue ball around a lot and use multiple rails.
The drill is Diagram Two is called the “Dynamite Cross of Death.” I named it that because it’s a very difficult drill, but great if you like a challenge. This is a rotation drill and I’ve added a touch of snooker to it by placing the 1, 7, 6, 2, 4, 3 and 8 where the yellow, brown, green, blue, pink, red and black would be placed in snooker. I added the 5 and 9 to complete the rack.
In this drill the first two shots are key. That’s pretty common in rotation games, where the first shot or two might be difficult, but if you can make it through those it is pretty smooth sailing. This drill is a matter of controlling the cue ball and keeping the right shape on the balls.
Again, I’ve illustrated the opening few shots to get you started. The shot on the 1 ball is a typical snooker shot from the yellow to the blue. Use follow with just a touch of left to get the cue ball to check up off the bottom rail and around for shape on the 2.
There are two ways to play from the 2 to the 3. You can use a touch of inside English to come one rail, or you can just go two rails for shape. You hit this shot nice and soft and let the cue ball do all the work.
The key in this drill is to stay on the right side of the balls. You have to go up and down the table a little here. Also, it’s important to keep the cue ball off the rail. Leaving the cue ball on the rail will really limit your ability to move the cue ball around the table.
Again, these are terrific drills to practice over the summer, when competition might be a little difficult to find. They are challenging, but rewarding. Master these and you will be ready once the league and tournament seasons resume.