A pattern drill that puts value on keeping the cue ball center table.
Here’s the first of a two-part series on the Triangle to Triangle 9-Ball Pattern Drill. It’s actually two variations of the same drill, but you will need to master this first (easier) version before taking on the more difficult version.
Don’t get me wrong, this first version isn’t easy. Starting here will help improve your cue ball and is a great example of why center table is almost always optimal. As with all pattern drill, this is about thinking three balls ahead and leaving angles for the next ball.
No power strokes required here. Follow, with a little English, should be sufficient. It’s more of a feel drill, and good cue ball speed makes the game so much easier.
The rules are simple. Starting with cue ball in hand, pocket the 1-9 in rotation. You’re not allowed to bump other balls. Beginners don’t need to hit a rail, but for advanced players the cue ball must contact at least one rail on each shot.
Obviously, each shot is going to be a little different, depending on where the cue ball comes to rest. But here is how I would ideally play the drill:
I’m going to start with a nice half-ball angle on the 1 and play it with a little high right to come two rails between the 3 and 7 balls for position on the 2 (Diagram One). Ideally, I’d like to have the identical position and shot on the 2 and take the cue ball two rails between the 4 and 8 balls. I’d like to leave the cue ball to shoot at the 3 in the window between the 5 and 9 balls.
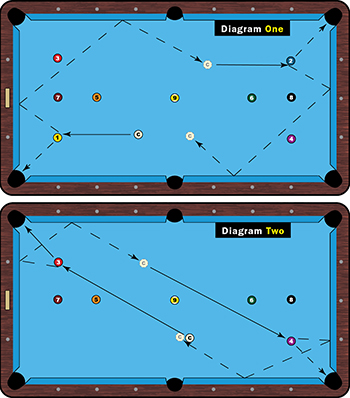
The shot for the 3 and 4 should be the same, high right with a good stroke on the balls (Diagram Two). Commit to the shot and use a good tempo. I see a lot of amateur players fail on this because they try to hit the ball too hard and with a quick stroke.
Once I get to the 5 ball (Diagram Three), I’m using left English because I want to make sure to leave a nice angle on the 6 ball. Just let the cue ball so the work. You don’t need to force balls. That’s when things go wrong, especially as you near the finish line and your adrenaline starts pumping.
I’m using a good half-tip of right English on the 6 with a good stroke because I need the cue ball to travel further this time to get closer to the 7. Not too much English because I want to avoid the side pocket.
The 7 ball is where a lot of players will stumble because it’s a more severe cut and the nerves are starting to kick in (Diagram Four). Stick with this shot. Shoot it again if you miss. Get the feel for it. In this case I landed pretty good on the 8 and have two options. I like to play two rails of the angle allows. Two-rail shots give me better speed control and feel for the shot. One rail is fine if you prefer. That would mean using less English and focusing more on the cue ball. The only negative for me, personally, is that it’s harder to guarantee position. I play this with a lot of left, which means you don’t have to hit it as hard. Let the spin do the work and hopefully the cue ball will hit the rail just before the side pocket. This takes a lot of practice to feel confident of avoiding the side pockets. Top pros are so good at this shot. Fans often think the player got lucky to not scratch, but most times they know exactly where that cue ball is going to catch the rail.
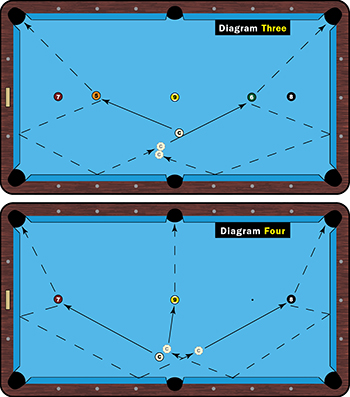
Another big shot on the 8 ball, although you don’t need to do a lot with the cue ball. With the position shown, I again prefer to go two rails with high cue ball and a lot of right English, using the second rail to slow the cue ball down. Again, one-rail here requires more touch and can be a little twitchy.
This is a great drill, and it will help improve cue ball speed and judging the amount of English needed. Using the rails will give you a good feel for the table. Leaving nice angles and sticking to a good rhythm makes this a great pattern drill for everyone.
Next month, however, won’t be so easy!