HomeAbout Billiards DigestContact UsArchiveAll About PoolEquipmentOur AdvertisersLinks
Darren Appleton


Instruction Articles:
• March 2024
More for the Road


• February 2024
Four for the Road


• January 2024
Corner the Market


• December 2023
Look Ma, No Cushions


• November 2023
We’re in the Money


• October 2023
Four-level Drill


• September 2023
More Money Ball


• August 2023
No rails, part II


• July 2023
Look Ma, No Rails!


• June 2023
Triangle To Triangle


• May 2023
Zone Blitz


• April 2023
Money Ball Drill II


• March 2023
Money Ball Drill


• January 2023
The Dreaded Shootout


• December 2022
Alternate Universe


• November 2022
Close Quarters


• October 2022
Corner to Corner


• September 2022
Diamond in the Rough


• August 2022
Draw Bridge


• June 2022
I Detect A Pattern


• June 2022
Stay Close to Work


• May 2022
Amateur Approved


• April 2022
Two for One


• March 2022
The Straight Secret


• February 2022
The Correct Shot


• January 2022
End Game, Part II


• December 2021
Buying Off The Shelf


• November 2021
Look, Ma! No Rails!


• October 2021
The Oval Drill


• September 2021
Getting In Shape


• August 2021
Corner-To-Corner


• July 2021
V For Victory


• June 2021
More Pattern Drills


• May 2021
Patterns and speed


• April 2021
See a pattern?


• March 2021
Blind Man


• February 2021
Five Up, Five Down


• January 2021
Don’t Lag Behind


• December 2020
Head games


• November 2020
Life on the Edge


• October 2020
The Family Tree


• September 2020
A Dip of the Tip


• August 2020
The Big Diamond


• July 2020
Nine-Ball One-Hole


• June 2020
You’ll Kick Yourself


• May 2020
Tight Quarters


• April 2020
Cue Ball Control


• March 2020
Straight Cueing


• February 2020
Saddle up!


• January 2020
9-ball Crossover


• December 2019
Ride Those Rails


• November 2019
Up and Down


• October 2019
Money Balls


• September 2019
Captain Zig-zag


• August 2019
15-Ball, No Rails


• July 2019
One Extra Ball


• June 2019
Two-Pocket Drill


• May 2019
Up and Down


• April 2019
Ultimate Rotation


• March 2019
In A Good Spot


• February 2019
Center Cut


• January 2019
Breaking Bad Habits


• December 2018
Monster!


• November 2018
X marks the spot


• October 2018
Striking It Rich


• September 2018
So Many Options


• August 2018
Put Hangers On Rail


• June 2018
Mirror, Mirror


• May 2018
“V” for Victory


• April 2018
Up and Down


• March 2018
Kick Into High Gear


• February 2018
Up and Down


• January 2018
Up To The Challenge


• November 2017
Taking A Break


• October 2017
End Game Safeties


• September 2017
Get Comfortable


• July 2017
Shape Up For Summer!


• June 2017
The Selection Process


• May 2017
Two For One


• April 2017
A Ghost of a Chance


• March 2017
Banker’s Holiday


• February 2017
Great Eight


• January 2017
Getting Into Shape


• December 2016
Hocus, Focus


• November 2016
Kicking Into High Gear


• October 2016
More Drill Bits


• September 2016
Hand Model


• August 2016
Breaking Tradition


• July 2016
Drawing On Experience


• May 2016
Proper Practice


• April 2016
Drilling For Improvement


• March 2016
Mind Games


Mirror, Mirror II
July 2018

Looking deeper into the mirror image kicking system.

Last issue, I described a quick and easy system for measuring angles for kick shots — the mirror image system. Generally speaking, the mirror image calls for you to find the desired contact point on the object ball (for one-rail kicks) or second rail (for two rail kicks), and follow a line from that point through the rail that you plan to hit first. Your aiming point is roughly twice the distance of the contact point to the edge of the rail.

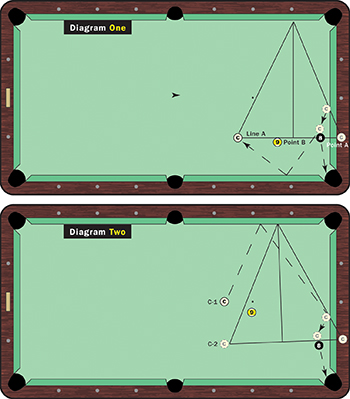
Of course, there are adjustments that will need to be made in some circumstances, and I will explain those later. First, let’s look at another example of a two-rail kick. The shot in Diagram One comes up quite often, but most players are still simply guessing where to strike the first rail.

In truth, you should make this shot a high percentage of the time. Using the mirror image approach will greatly improve your chances.

Again, begin by determining the ideal contact point on the 8 ball. Draw an imaginary line to the rail, then double that distance (Point A). Now, find the halfway point (Point B) between the cue ball and that point on the rail. The line to the long rail (Line A) will give you the ideal spot for the cue ball to hit that first rail.

Once you have determined those points, it is all about execution and trust. Use high cue ball with a trace of running English, with enough speed to make the shot and get the cue ball to return to its original spot. This speed will give you the best chance to leave your opponent safe if you don’t make the shot.

So, what happens if the cue ball is in a position that is not in line with the ideal contact point?

As you can see in Diagram Two, the cue ball (C-1) being closer to the center of the table makes gauging the shot a little more difficult. For starters, find that contact point on the 8 ball again. Follow a line from the cue ball to a point that is in line with the 8 ball (C-2). Now you can do the same measurements that you did for Diagram One. Once you have established the line of aim from C-2, imagine a parallel line from C-1. That line will give you the proper path to the contact point on the second rail.

Since you have to draw an imaginary line from the actual cue ball position (C-1), I find it helpful to pick out a spot in the distance that is along that parallel line of aim. It could be a chair, a picture on the wall, etc. This is important because this is where a lot of players get stuck if the cue ball isn’t perfectly lined up with the 8, as in Diagram One.

Try a few shots like these and you will quickly see impressive results. After a while, finding the proper lines of aim will become quick and easy.

MORE VIDEO...