HomeAbout Billiards DigestContact UsArchiveAll About PoolEquipmentOur AdvertisersLinks
Darren Appleton


Instruction Articles:
• September 2024
Negotiating traffic


• August 2024
Drill Variations


• July 2024
V for Victory


• June 2024
Circle the wagons


• May 2024
Rehearse Your Lines


• April 2024
Lucky Seven


• March 2024
More for the Road


• February 2024
Four for the Road


• January 2024
Corner the Market


• December 2023
Look Ma, No Cushions


• November 2023
We’re in the Money


• October 2023
Four-level Drill


• September 2023
More Money Ball


• August 2023
No rails, part II


• July 2023
Look Ma, No Rails!


• June 2023
Triangle To Triangle


• May 2023
Zone Blitz


• April 2023
Money Ball Drill II


• March 2023
Money Ball Drill


• January 2023
The Dreaded Shootout


• December 2022
Alternate Universe


• November 2022
Close Quarters


• October 2022
Corner to Corner


• September 2022
Diamond in the Rough


• August 2022
Draw Bridge


• June 2022
I Detect A Pattern


• June 2022
Stay Close to Work


• May 2022
Amateur Approved


• April 2022
Two for One


• March 2022
The Straight Secret


• February 2022
The Correct Shot


• January 2022
End Game, Part II


• December 2021
Buying Off The Shelf


• November 2021
Look, Ma! No Rails!


• October 2021
The Oval Drill


• September 2021
Getting In Shape


• August 2021
Corner-To-Corner


• July 2021
V For Victory


• June 2021
More Pattern Drills


• May 2021
Patterns and speed


• April 2021
See a pattern?


• March 2021
Blind Man


• February 2021
Five Up, Five Down


• January 2021
Don’t Lag Behind


• December 2020
Head games


• November 2020
Life on the Edge


• October 2020
The Family Tree


• September 2020
A Dip of the Tip


• August 2020
The Big Diamond


• July 2020
Nine-Ball One-Hole


• June 2020
You’ll Kick Yourself


• May 2020
Tight Quarters


• April 2020
Cue Ball Control


• March 2020
Straight Cueing


• February 2020
Saddle up!


• January 2020
9-ball Crossover


• December 2019
Ride Those Rails


• November 2019
Up and Down


• October 2019
Money Balls


• September 2019
Captain Zig-zag


• August 2019
15-Ball, No Rails


• July 2019
One Extra Ball


• June 2019
Two-Pocket Drill


• May 2019
Up and Down


• April 2019
Ultimate Rotation


• March 2019
In A Good Spot


• February 2019
Center Cut


• December 2018
Monster!


• November 2018
X marks the spot


• October 2018
Striking It Rich


• September 2018
So Many Options


• August 2018
Put Hangers On Rail


• July 2018
Mirror, Mirror II


• June 2018
Mirror, Mirror


• May 2018
“V” for Victory


• April 2018
Up and Down


• March 2018
Kick Into High Gear


• February 2018
Up and Down


• January 2018
Up To The Challenge


• November 2017
Taking A Break


• October 2017
End Game Safeties


• September 2017
Get Comfortable


• July 2017
Shape Up For Summer!


• June 2017
The Selection Process


• May 2017
Two For One


• April 2017
A Ghost of a Chance


• March 2017
Banker’s Holiday


• February 2017
Great Eight


• January 2017
Getting Into Shape


• December 2016
Hocus, Focus


• November 2016
Kicking Into High Gear


• October 2016
More Drill Bits


• September 2016
Hand Model


• August 2016
Breaking Tradition


• July 2016
Drawing On Experience


• May 2016
Proper Practice


• April 2016
Drilling For Improvement


• March 2016
Mind Games


Breaking Bad Habits
January 2019

Don’t make amateur mistakes on your 9-ball break.

With all of the coaching I do and chatting with amateur players, the most common questions are about the break shot.

The easiest way to explain the break shot in 9-ball is to point out the most common mistakes amateurs make and explain the consequences.

First, amateurs almost always have their eyes trained on the 1 ball during their backswing. Because you are trying to generate more power with the break than any other game shot, you really need to keep your eye on the cue ball. The harder you hit the ball, the more difficult it is to keep your stroke straight. Keep your eyes on the cue ball and make sure you strike it exactly where you intend to strike it. Of course, you should look at where you want to hit the 1, but when you are preparing your last practice stroke, shift your eyes to the cue ball contact point.

Another key mistake is where amateurs aim to hit the 1 ball. Most amateurs attempt to hit the 1 ball as if they were breaking from the center of the table. The problem with this is that the cue ball will travel wide to the left. That, in turn, presents a number of potential problems — scratching in the side pocket; the wing ball going to the long rail. The risk is high with this approach, and the chances of making a ball are slim.

Amateurs tend to aim either too high or too low on the cue ball. Additionally, because they are trying to hit the cue ball so hard, they tend to lift their head and body too early. If that happens, all bets are off. You’ve lost control of the cue ball and you will likely miss the intended contact point on the 1 ball by a wide margin. Reduce your power and you will gain control. Once you learn to control the cue ball and strike the 1 with precision and consistency, you can gradually add power to your stroke.

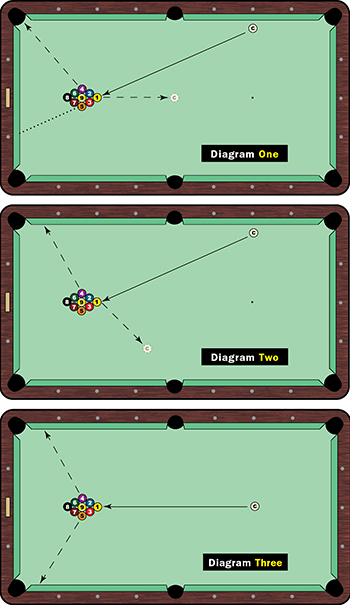
Diagram One offers the perfect set up. I always check my alignment and sighting before I get down over the shot. My line of sight is through the 1 ball to the first diamond on the bottom rail (dotted line). I aim just below center on the cue ball (no English) and hit the 1 ball square. At contact, my eyes are always on the cue ball. Pure contact is essential, and I make sure my arm extends through the shot. If the rack is good, you’re guaranteed to pocket the wing ball (the 4 ball in the diagram).

Now take a look at Diagram Two. This is the result if you aim to hit the front of the 1 ball, as if you were shooting at it from the center of the table. This is a very common mistake. The result is that you lose control of the cue ball (and risk scratching into the side pocket), you do not get a good split from the rack and the wing ball will run short of the corner pocket.

Another mistake I see from amateurs is breaking from the center of the table (Diagram Three). They assume that breaking straight on will allow them to use maximum power and get full contact on the 1 ball. The problem is that the wing balls will invariably hit the long rail short of the corner pockets.

Next month: The 10-ball break.
MORE VIDEO...