Planning ahead and facing last-ball pressure ó 9-ball version.
Here is a spin-off drill from last monthís Money Ball 10-Ball Drill. This is the 9-ball version. The similarity is that you shoot the lowest ball on the table first, then the ďmoney ballĒ ó in this case, the 9 ball. Then you re-spot the 9 and play the next lowest ball, and so on. The difference here is that this version is played on just one end of the table.
This is a good, easy-to-follow drill but can be very effective in helping you with your touch, stroke and pattern play. And donít be fooled by how easy this drill looks. It can be easy if your cue ball is really good, but itís also very easy to get out of line. Itís a great drill for all levels, but especially for amateurs looking to improve their touch and patterns in tight areas. There are no long shots, so shot-making is the easiest part of the drill. This drill is really about the cue ball, so it will help you in all games.
I say it all the time: Touch and staying in line is what really separates the great pros from the good pros and the good amateurs from the low-level amateurs. Cue ball control is something I pride myself on and something Iíve worked on my entire career. One of the reasons I donít class myself as a great shot maker is because my cue ball control was so good that I was rarely in a position to have to make a long, tough shot.
One of the reasons I like these ďmoney ballĒ drills is because many amateur players struggle getting from the key ball to the money ball. In this drill, every shot is a key ball, so you learn one ball after the next how to hold your focus and nerve to get on that next shot.
There are several versions of this drill. Stay within your ability at the start. You can shoot the 1-9 in rotation, allowing the cue ball to land anywhere and use any rails but you must not bump into balls; you can shoot lowest numbered ball followed by the 9 but allow the cue ball to go anywhere; you can do the drill as shown, in which the cue ball must stay in the zone area ó from the middle diamond line to the middle of the table (side pockets). If the cue ball leaves that zone, you must start over.
Again, if your cue ball is good, this drill isnít that difficult, but it does demand focus.
Here is roughly how the drill went for me. If you stray too far from this approach it will be difficult.
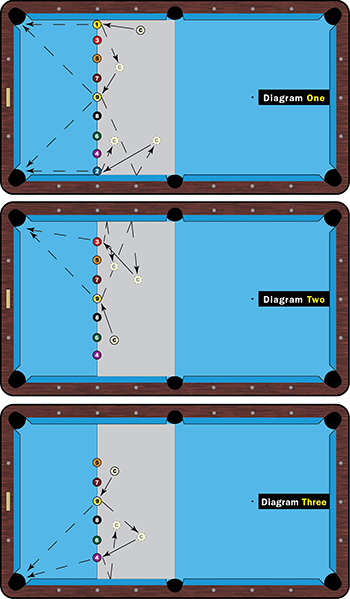
Starting with the 1 ball (Diagram One), use a soft little draw with a touch of right, which is important with balls frozen along the rail. Donít quit on the shot. That leads you to the 9 ball, which is a punch shot with a touch of left. Using the rail will allow you to let your stroke out a little and land on the right side of the 2.
For the 2 ball I just kill the cue ball with a touch of left. This helps throw the 2 ball into the corner pocket and holds the cue ball below the 9. As always, weíre thinking two or three shots ahead. Itís important to practice these little soft punch or draw shots. I shorten my stroke a bit.
In this case, I got perfect position on the 9 ball (Diagram Two), so I just needed a little follow, adding a tip of right and using the rail again to come out for the 3 ball.
Again, with the proper angle on the 3, all that is required is a little follow and a tip of right English for the 9. Here, I didnít leave as much angle on the 9 as I wanted (Diagram Three). Itís important that you find a way to get back into proper position from this stage on. I just used a punch draw. Again, shorten your stroke to gain maximum feel and control.

I landed a little straight on the 4 ball. When this happens you have to hit the cue ball pretty firm with a punch stroke, so stay down and focused so that you donít miss the shot.
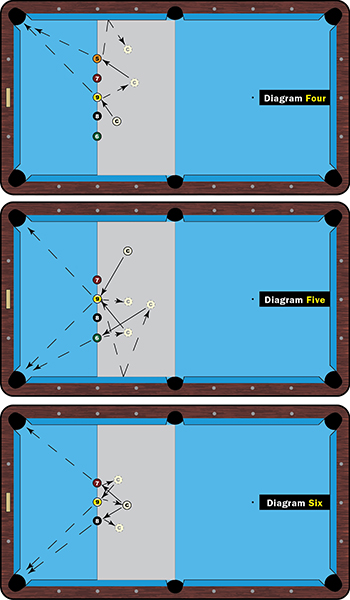
Itís always nice when you land perfectly on the 9 (Diagram Four), as is the case here. You donít need to use a rail. Just a little draw shot. Again, shorten your stroke in tight spaces like this. You can shorten your stroke by either shortening your back stroke or by moving your bridge hand a little closer to the ferrule.
The 5 ball here requires a little punch shot, using the rail for position. With a wider angle on the 9 (Diagram Five), follow the cue ball to the long rail using a quarter-tip of left. With perfect position here on the 6 ball; again I can just draw back a few inches.
While Iím perfect on the 9 ball here, this is where a lot of players will break down. Stay focused. Just a little draw shot, so shorten your stroke.
On the last few shots ó the 7, 8 and alternating 9 balls ó try to stay close to your work with little draw shots (Diagram Six). Those shots are so easy. This will also allow you to go from shot to shot without having to use the side rails.

As you can see, it doesnít look hard, but it can be tricky and requires your complete focus. Itís a must drill for amateurs that need to work on pattern play.


