A new drill that offers a great challenge.
Occasionally, I get really creative and invent a drill that will challenge me.
I made up this month’s drill recently and fell in love with it straight away. I call it the 16 Shot, Double Diamond 9-Ball Chain Drill. It’s difficult, but there are two versions so everyone can have a go at it.
This drill has a bit of everything, even a touch of snooker style. It focuses on playing shape for the key ball (the 9) but still thinking two or three shots ahead each time. Like all good drills, this will help with all aspects of your game — using the rails, pattern play, options, speed control.
The rules are that you shoot the 1-9 in rotation, and you can shoot them into any pocket. The kicker is that after making the lowest ball each time, you must shoot the 9. You then re-spot the 9 and shoot the next-lowest ball on the table. So, you shoot the 1, then the 9. Re-spot the 9 and shoot the 2, then the 9 again, and so on.
The drill is 16 shots in all. If this proves too challenging, you can choose any ball first, but you must still shoot the 9 with your next shot. Either way, you can’t bump other balls.
The shots don’t get any easier (particularly from the 4 to the 9 and the 9 to the 5 because you change sides of the table), so you must maintain focus and concentration throughout this drill. Your creativity will be tested if you do get a little out of line and need to find a way to get back in position.
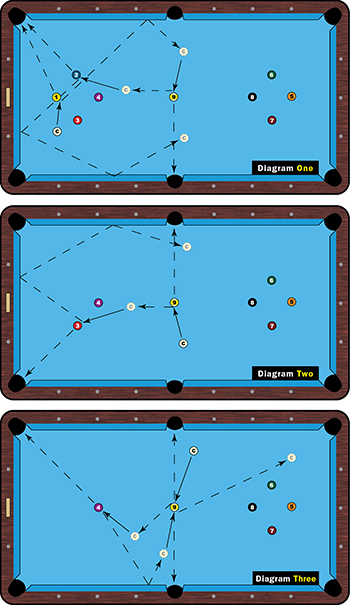
It’s an easy drill to set up, as indicated in Diagram One. Starting with ball in hand, leave a nice angle on the 1 ball for a natural path to the 9 ball. Stay above the 9 to offer a natural path toward the 2. With the 1 gone and the 9 re-spotted, follow two rails off the 2 ball for position on the 9.
Soft draw will get you from the 9 to the 3 ball (Diagram Two). Follow two rails off the 3 ball.
There are a number of options on the 9 here, but I would make the position from the 4 to the 9 as easy as possible. This is the shot you need to be near-perfect on because the key shot to this drill will be shape on the 5 ball.
I would try to get almost straight on the 4 ball (Diagram Three) just to make certain you get on the right side of the 9.
If you happen to land on the 9 as shown in the diagram, congratulations! The next shot would be just about feel and judging the speed.
If you have a half-ball cut on the 5 ball, use the same shot you played on the 1 ball to get back to the center of the table for the 9. If the angle is bigger, you probably need to go three rails around the table.
If you’ve gained the position from the 5 to the 9 as shown in the diagram, you’re well on your way home. As long as you’re close to the 9 ball, you can more or less repeat the same pattern as you used from the 1 to the 4 balls.
From the 9, try to keep up table and close to the 9 ball position for your next shot on the 6. Again, two rails with follow will do the trick, more or less repeating the same pattern as the 1-4 diamond chain.
For the 9 ball, staying close to your work will always make life easier and the balls less missable.
Use two rails with follow on the 7 ball. If you can gain position on the 9, you’re getting close to the finish line. One more decent positional finish on the 9 ball and you’re home free.
Don’t lose focus on the 8 ball. Keep it simple. Remember, any pocket for that final 9 will do.
If you use the Level 2 version of this drill, you would do well to still take the 1 ball as your first shot because it clears the cue ball’s path for the outer balls in the diamond. This version is a great starter option and will still build your game and give you the confidence to eventually attack Version 1.
This is a tricky little drill for sure, but a fun one. It’s easy to set up and it will help you improve every aspect of your game, including your mental game. It has everything you need in a drill without being crazy hard. Enjoy.