More pattern play that combines cue ball speed and creativity.
Here is an excellent follow-up to the pattern drill I offered last issue (ďUp and Down,Ē April 2018). Those of you that have been following these drills and making progress will find this Vís Rack Drill right in your wheelhouse. This is another drill that focuses on cue ball speed and learning to use the angles the right way, so it offers an excellent opportunity for even greater progress.
As most of the pattern drills emphasize, staying on the right side of the next object ball is a major focus in this drill. You canít constantly be chasing position, so really focus on staying on the proper side of the ball. It will help you immensely with all pool disciplines.
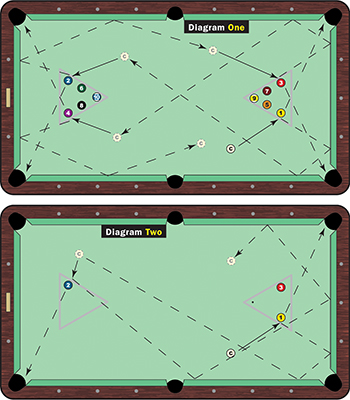
The setup on this drill is fairly simple. Create a five-ball wedge on both the head spot and the foot spot, keeping a little less than a ballís width between each ball. The odd-numbered balls will go on one end, with the even-numbered balls set up on the other, as shown in Diagram One. The object is to pocket the 1 through 10 in rotation. The cue ball is not allowed to contact another ball. You can use as many rails as you wish. In some cases, you may not even need to use a rail.
Starting with cue ball in hand, choose a path that will allow you to get around the table for position on the 2 that, in turn, will lead you back up table for the 3 ball, and so on. In the instance shown here, Iím going two rails for position on most shots. The critical thing is speed control with the cue ball, which will assure that you stay on the right side of the object ball.
As was the case with last monthís drill, this drill takes the cue ball up and down the table, so it offers an excellent opportunity to let your stroke out a little. That, in turn, will help you get a great feel for the speed of the table and the table conditions (rails, etc.).
Of course, one of the things that separate top players from others is their ability to recover when they do go out of line or on the wrong side of the object ball. Being a little creative will help you recover. You already know the spot that you would like the cue ball for the next shot, so check the angles and see if you can find a recovery path.
Diagram Two shows an example of how I misjudged the speed on a shot and the cue ball ran a little long. Iím definitely on the wrong side of the 2 for easy two-rail position on the 3. Instead, the natural angle off the 2 will get me there. This is a nice little three-rail recovery shot that will get me right back on track.
Many of these pattern drills seem similar. But they all force you to use slightly different speeds and creativity. They give you a great feel for the table, the speed of the cloth and the rails. And there are different ways to get to the proper position. Again, some of these shots might not even require you to use a cushion. Continually look ahead from one object ball to the next so that you are aware of which side of the next object ball is preferable. Once youíve mastered these drills, you will be prepared to confidently and effectively work your way around any table in any pool discipline.


