Prepare yourself for a real challenge with this two-way drill.
Here is a great drill that has two versions, one being a very challenging one-pocket rotation drill. The benefits with both versions are learning to control your cue ball in tight areas and playing good patterns with multiple options. Be warned: The one-pocket version will drive you crazy, but it will show improvement in your game, particularly staying on the right side of the object ball and leaving angles. This is what makes rotation games so different than 8-ball and snooker.
With these drills it is important to stay close to your work and keep the cue ball coming towards your next target. Giving yourself less work is what separates the top players from good players.
In both versions of the drill, start with ball in hand and shoot the 1-9 in rotation. No bumping balls. I’m going to run through the high-level one-pocket version of the drill, but most mid-to-lower-level players will want to start with the version that allows you to shoot each ball into any pocket.
Congested areas appear in all games, which makes it important to have good touch and a good feel for the cue ball. Finesse gives you a skill required to advanced to different levels of the game. We all tend to want to punch the ball and let our arm go with a good solid stroke. But feel and touch are equally important.
Don’t baby the ball on the 1 (Diagram One). You don’t want to come up too short or too long. Leave a nice angle so you can play with follow and a touch of left. Or, as I did here, leave a little less angle and play a soft punch shot.
With the angle shown, high with a touch of right english. Don’t land high because you can’t get position for the 4 with all those balls in the way. Coming into the right line is so important. This position is perfect for the 3. Remember, you have to think three shots ahead, so soft draw with a touch of right on this shot and try to land short on the 4 ball.
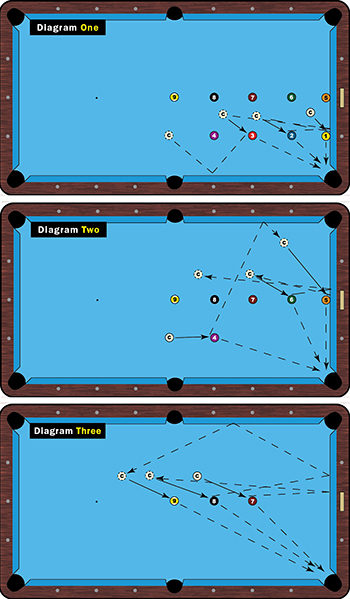
The shot on the 4 (Diagram Two) requires a good solid stroke. Depending on your angle, punch through, trying to avoid the 8. This is the transition shot to the other line of balls, so it’s the toughest shot in the drill. If you can negotiate it, you’re a good favorite to complete the drill.
I like to use a trace of left on the 5 because it makes the pocket a little bigger.
You’re in the home stretch, so stick to your routine from here. Nice high cue ball and try to get on the top side of the 7. Don’t panic if you come up short and have to use the long rail. Just make sure you come above the 9 and not between the 8 and 9.
Use a nice stroke and high cue ball to get on the top side of the 8 (Diagram Three). Again, don’t panic if you don’t. With more space your options increase and allow you to let your arm out more and be more creative if necessary.
As long as you’re above the 8 ball you’ve got tons of options. You can use follow with no english and come straight back up or follow with left (as shown here). It’s easy to feel the speed and offers a better angle to come into for the 9 ball.
Hopefully, you land nice and straight on the 9 ball!
And hopefully you can see the benefits of both versions of this drill. The one-pocket version will frustrate you for sure, but it will also improve your game and your understanding of tight spaces and good touch/feel. If you can complete this drill, you will have made life on the table a lot easier for yourself.