HomeAbout Billiards DigestContact UsArchiveAll About PoolEquipmentOur AdvertisersLinks
Darren Appleton


Instruction Articles:
• May 2025
Must do!


• April 2025
1-P Mouse Trap


• March 2025
Using All Your Tools


• February 2025
Look, no rails!


• January 2025
Workin’ On the Rail Road


• December 2024
Options


• November 2024
More Pattern Drills


• October 2024
A Different Line-up


• September 2024
Negotiating traffic


• August 2024
Drill Variations


• July 2024
V for Victory


• June 2024
Circle the wagons


• May 2024
Rehearse Your Lines


• April 2024
Lucky Seven


• March 2024
More for the Road


• February 2024
Four for the Road


• January 2024
Corner the Market


• December 2023
Look Ma, No Cushions


• November 2023
We’re in the Money


• October 2023
Four-level Drill


• September 2023
More Money Ball


• August 2023
No rails, part II


• July 2023
Look Ma, No Rails!


• June 2023
Triangle To Triangle


• May 2023
Zone Blitz


• April 2023
Money Ball Drill II


• March 2023
Money Ball Drill


• January 2023
The Dreaded Shootout


• December 2022
Alternate Universe


• November 2022
Close Quarters


• October 2022
Corner to Corner


• September 2022
Diamond in the Rough


• August 2022
Draw Bridge


• June 2022
I Detect A Pattern


• June 2022
Stay Close to Work


• May 2022
Amateur Approved


• April 2022
Two for One


• March 2022
The Straight Secret


• February 2022
The Correct Shot


• January 2022
End Game, Part II


• December 2021
Buying Off The Shelf


• November 2021
Look, Ma! No Rails!


• October 2021
The Oval Drill


• September 2021
Getting In Shape


• August 2021
Corner-To-Corner


• July 2021
V For Victory


• June 2021
More Pattern Drills


• May 2021
Patterns and speed


• April 2021
See a pattern?


• March 2021
Blind Man


• February 2021
Five Up, Five Down


• January 2021
Don’t Lag Behind


• December 2020
Head games


• November 2020
Life on the Edge


• October 2020
The Family Tree


• September 2020
A Dip of the Tip


• August 2020
The Big Diamond


• July 2020
Nine-Ball One-Hole


• June 2020
You’ll Kick Yourself


• May 2020
Tight Quarters


• April 2020
Cue Ball Control


• March 2020
Straight Cueing


• February 2020
Saddle up!


• January 2020
9-ball Crossover


• December 2019
Ride Those Rails


• November 2019
Up and Down


• October 2019
Money Balls


• September 2019
Captain Zig-zag


• August 2019
15-Ball, No Rails


• July 2019
One Extra Ball


• June 2019
Two-Pocket Drill


• May 2019
Up and Down


• April 2019
Ultimate Rotation


• March 2019
In A Good Spot


• February 2019
Center Cut


• January 2019
Breaking Bad Habits


• December 2018
Monster!


• November 2018
X marks the spot


• October 2018
Striking It Rich


• September 2018
So Many Options


• August 2018
Put Hangers On Rail


• July 2018
Mirror, Mirror II


• June 2018
Mirror, Mirror


• May 2018
“V” for Victory


• April 2018
Up and Down


• March 2018
Kick Into High Gear


• February 2018
Up and Down


• January 2018
Up To The Challenge


• November 2017
Taking A Break


• October 2017
End Game Safeties


• September 2017
Get Comfortable


• July 2017
Shape Up For Summer!


• June 2017
The Selection Process


• May 2017
Two For One


• April 2017
A Ghost of a Chance


• March 2017
Banker’s Holiday


• February 2017
Great Eight


• January 2017
Getting Into Shape


• December 2016
Hocus, Focus


• November 2016
Kicking Into High Gear


• October 2016
More Drill Bits


• September 2016
Hand Model


• August 2016
Breaking Tradition


• July 2016
Drawing On Experience


• May 2016
Proper Practice


• April 2016
Drilling For Improvement


• March 2016
Mind Games


Safe percentages
June 2025

Not all safeties are equal. Some offer higher win percentages.

One common mistake that both amateurs and pros will make is not playing the best percentage safety shot. And this month we’ll look at a shot that comes up over and over again, and a shot on which many players play the wrong safety.


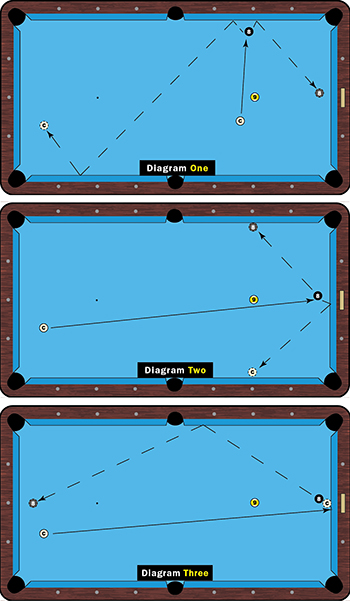
Diagram One shows two balls remaining and the cue ball and 8 ball almost parallel. Most amateurs will play safe by trying to put the 8 on the short rail and send the cue ball two or three rails in an attempt to get both balls close to the middle of the short rail on each end of the table.

Mind you, this is not a terrible shot and will probably win 50 percent of the games. But the shooter missed an easier opportunity to really put the opponent in a bad spot and win 75-80 percent of these racks.

The top players excel because of their great table IQ. They’re able to work out the best percentages with the available shot options. But you can do it, too. And there’s always something to be said for a good safety.

So, let’s take a look at the options on this shot.

I’ve already shown you the most common approach, which is in Diagram One. It’s an easy safety, but the problem is if you leave an edge of the ball, a simple side-to-side shot (Diagram Two) is an easy response. If there is enough room behind the 8, your opponent could also respond with a kick-and-stick (Diagram Three), which includes the added chance to make the 8 in the side pocket. If you leave the opponent options, you’re going to have the tables turned on you in a hurry. (Of course, banking the 8 is an option but a low-percentage one.)

Your best bet with this shot is shown in Diagram Four. If you play the shot this way you probably win 80 percent of the time. It takes practice so that you are confident that you won’t scratch.

I spin the cue ball with a good half tip of left english and try to land between the first diamond on the long rail and the first diamond on the short rail. I want the 8 ball on the short rail between the first diamond and middle diamond, but at all costs I don’t want my opponent seeing the right side of the 8. That’s the key.


The benefits of this shot are obvious. Your opponent can’t see the right side of the 8 ball, and hitting the 8 thin on the left will likely let it leak out (Diagram Five). This happens a lot because clipping it so thin that it doesn’t leak out is extremely difficult. If your opponent can see enough of the 8 ball, he could try the shot in Diagram Six, but good luck with that. This is a very difficult shot to judge, and I don’t like letting the cue ball loose like this shot would require. Again, banking the 8 up and down the table is way too risky. A kick shot is another possibility, but so many things could go wrong. The percentages of you kicking it perfectly to either stick the cue ball at that end of the table or sending the 8 side to side and the cue ball back up table are both very low.

Everything really depends on how much of the 8 ball you allow your opponent to see. I prefer my little dump shot because it is simple and has won me a lot of games compared to the option in Diagram One.

MORE VIDEO...