Keeping your cue ball in the middle of the table opens options.
Here is one of the best cue ball drills there is! It’s great for all levels and will show you the value of keeping the cue ball in the middle of the table.
Controlling your cue ball path and speed and finding the center of the table opens up a lot more options and opportunities. If you stay in the middle of the table, you don’t have to be perfect with the cue ball. This drill is super helpful for your 8-ball game but is beneficial for all games.
On the surface, this drill doesn’t look like much, but what I like about it is that you can never switch off. You have to focus on every shot because in addition to pocketing the ball, you have to get the cue ball to the center of the table. And, as always, the pressure mounts the closer you get to the end of the drill, which is also good for your game and for trusting your stroke under pressure.
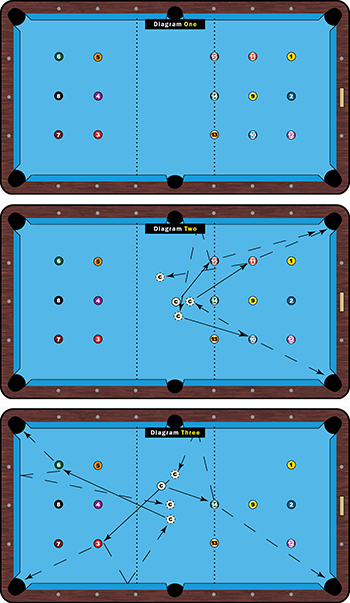
Position the balls as shown in Diagram One and start with the cue ball at the center of the table. Shoot the balls in any order but you can’t bump any balls along the way. The caveat is that the cue ball must land between the center lines after every shot.
Let’s take a run through a rack that I took on. Of course, position after shots will likely alter your choices, but you will get the idea here.
I started with the 15 ball (Diagram Two), shooting a soft pinch shot with a half tip of left. My intent here was to play shape for either the 10 or the 13 ball, knowing that additionally I’d have options with the 5 and 3. If you can, always play for more than one ball. It’s really helpful. Additionally, this thinking will help with your pattern play, especially in 8-ball and straight pool.
I landed fine for the 10 ball, so I’ll shoot that next and draw the cue ball straight back, which gives me options for the 11, 3 or 5 balls.
Shooting the 11 from here and again drawing back to the center will offer me several options.
My choice would be the 14 (Diagram Three) because taking this ball off the table frees up even more options. Again, a little punch draw with a half tip of left will get the cue ball to the side rail below the side pocket and back out toward the middle of the table.
It’s about time to take some balls from the other end of the table in order to maintain options at both ends going forward. I decided to shoot the 3 ball, using draw with a half tip of left.
It’s also important to take the corner balls away when you can. These balls are a diamond in and a diamond from the short rail, so use a nice high cue ball and a touch of right.
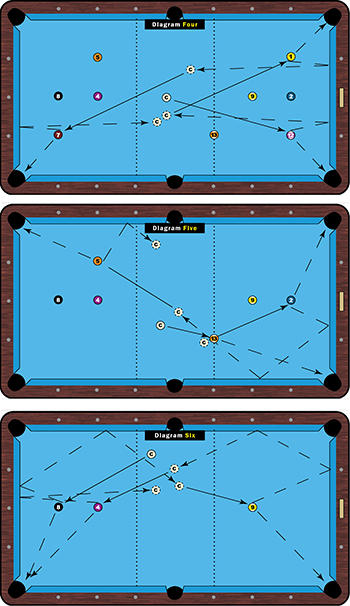
Now I’m in position to take another corner ball off the table, this one the 12 (Diagram Four). A shot like this, one rail high on the cue ball, is all about feel. I used the same approach on the 1 ball next.
Now you can really see the pattern. It’s important to free up shots while at the same time giving yourself other options if you don’t get the position you’d ideally like to have. I selected the 7, another shot similar to the previous two.
I ended up straight on the 13 (Diagram Five), allowing me to pocket it and draw back just an inch or two for the 2 ball in the opposite corner. The bottom, center balls (2 and 8) are the biggest shots in the drill because they are likely to be fairly thin cut shots and the pressure is mounting. High cue ball with a good tip of right will take the cue ball two rails back to the center of the table.
You need to play shape for the 8 off the 5, so I used a soft punch draw and a touch of right. I know that if I draw it too far back, I can always shift gears and shoot the 9.
My angle on the 8 will determine my shot, but another soft punch draw show and a little right should leave me an angle on the 9 or 4.
I used a high cue ball and tip of left on the 9 (Diagram Six). Remember to leave an angle on that final 4 ball because even on the final shot you need to get the cue ball back between those center lines.
Don’t take that last shot for granted. High cue ball and a tip of left and make sure you get back to the center.