Part Two of the Center Line Drill is a bigger challenge.
Last month I showed you Part I of the Center Line Drill, a drill that focuses on keeping your cue ball in the middle of the table, which gives you more options for your next shot. Of course, getting your cue ball to the center throughout a drill like this requires you to understand different types of strokes, the importance of speed control and, of course, managing pressure.
Additionally, this drill will really dial in your thought process and stroke execution. Put all that together and the game will get easier.
Part II of this drill is a bit harder but therein lies the challenge! For starters, this version uses 16 balls. (I used two 9 balls here.) Again, the cue ball starts in the middle of the table, and you can shoot any ball in any order, but you can’t bump another ball. And, of course, the cue ball always has to land between the dotted center lines after every shot.
Here’s how I ran through this drill recently:
I started with the 1 ball (Diagram One), using a high cue ball and a half tip of right to come back to almost the same spot. From there, I had an angle on the 5 ball that allowed me to use simple high, no spin needed.
A slightly steeper angle on the 6 ball, so I used a low cue ball, around 4 o’clock.
Back to the center, I opted for the 3 ball, again using a high cue ball and a half tip of left. I was left with almost the same shot on the 11 ball, high and a touch of left.
Position from the 11 left a short, easy shot on the 10 (Diagram Two), using a punch draw — a tip below center and a quarter tip of right.
The goal here is to clear the outside balls first, which creates more room for the cue ball as you finish with the balls along the rail. I started with a longer shot on the 7. You need focus on using a good stroke for this shot, hitting the cue ball at 5 o’clock.
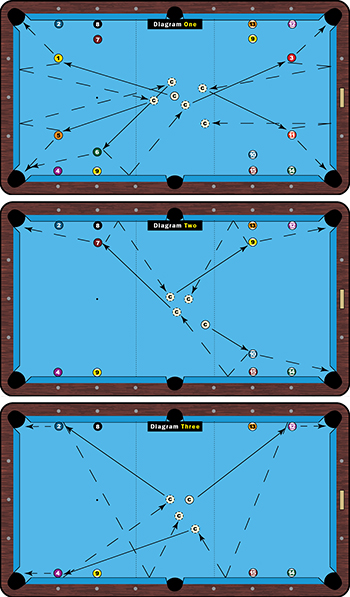
Next, punch the 9 ball in, using a half tip of left, bringing the cue ball back out to the center. Use a strong stroke on this shot.
You have options for the final eight balls along the long rails. Obviously, you need to be as close to the middle of the table as possible for good angles on the first four, which will be the balls closest to the corner pockets.
From this position, I’m starting with the 12 ball (Diagram Three). Hit the cue ball at 7 o’clock, using a nice, smooth hit at medium speed.
If you land between angles, choose the 4 ball, using straight draw back to the middle of the table for the 2. This shot requires good timing and a medium stroke, hitting the cue ball at 5 o’clock.
You could take the 14 ball here (Diagram Four), but the second 9 ball suits my eye better. I shot this a tip below center and a quarter tip of left. Let your stroke flow but don’t overpower the shot.
I was left without much angle here, choosing the 13 to get on the 14. Straight draw is fine here. No english needed.
Perfect position for the 14, so just a smooth stroke. Let the cue ball do the work. Cue at 5 o’clock.
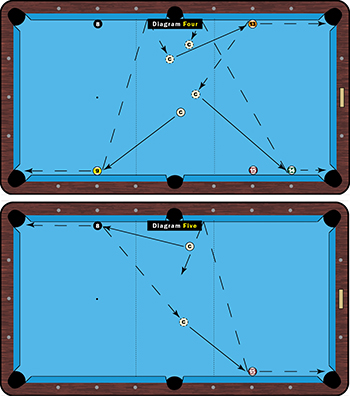
Home stretch now. If you’ve gotten this far, stay calm and focused for the final two balls. Learn how to handle the pressure. Use a tip below center and a half tip of right on the 8 ball. Let your stroke out to get position on the final 15.
Maintain a nice medium stroke on the last ball, cueing just below center.