When i get new students, we start out with the fundamentals and basic stroking and pocketing skills. But when we advance to position drills, they tend to struggle a lot and get really frustrated. Over time, it dawned on me that their struggles were tied to the pressure and expectations of completing the entire drill.
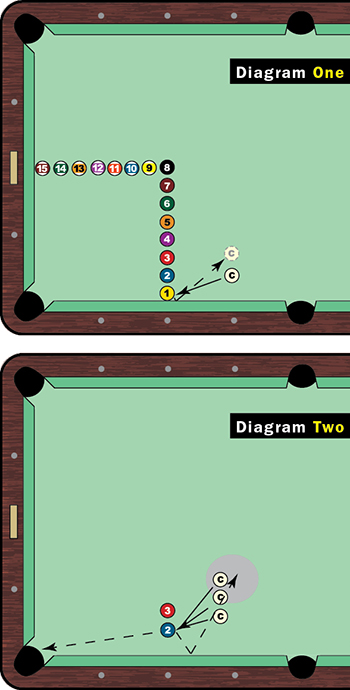
And when I thought about it, drills like the ďL DrillĒ (Diagram One), which was the first drill I ever had to master, are really intimidating. You get out of line on the second or third ball and you get frustrated because you have 13 more balls to go and you donít know how to recover. You get so focused on all 15 balls being there that you lose track of things you need to work on to be successful, like learning how to get to the spot you want.
So, I decided to make the same drill easier for them to understand and master by breaking up the drill. Instead of setting up all 15 balls, I simply set up the first two shots and told them to go from point A to point B.

Once they have mastered that, I take away the 1 ball and add the 3 ball (Diagram Two). I draw a circle where I want them to send the cue ball (shaded area). After that, I draw three smaller circles that indicate different cue ball starting points that they may have landed on. That teaches them how to get to the position circle from different spots. Itís a way of teaching the students how to get back in line if their last shot ran a little long or a little short. For instance, if they went long and left themselves a thinner cut on the next ball, they know they must use less speed on the shot because there is less cue ball contacting the object ball. Conversely, if they end up a little full on the next shot, they will have to hit the shot with more speed to get back into line.
This approach really helps speed up the learning process.


